
Learning how to make a deco mesh wreath for beginners is much easier when you build the wreath one layer at a time. You don’t need complicated tools or a large collection of decorations to make your first wreath. A wire frame, deco mesh, and a few secure ties are enough to learn the basic technique.
This step-by-step tutorial focuses on an approachable ruffle-method wreath. You’ll learn how to prepare the frame, measure mesh, gather ruffles, attach ribbon, and finish your design. We also include a real yardage calculation so you can plan supplies before making your first cut.
Quick Answer: To make a deco mesh wreath, attach chenille stems to a wire wreath frame, cut 10-inch-wide deco mesh into measured pieces, gather each piece into a ruffle, and secure the ruffles to the frame. Continue until the wreath looks full, then add optional wired ribbon, a bow, or a sign. Fluff the mesh and check every attachment before hanging.
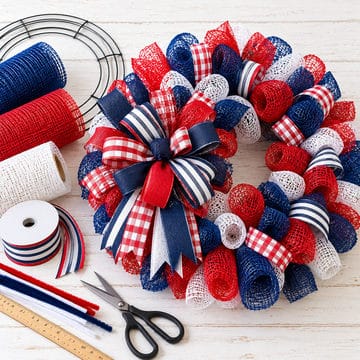
Table of Contents
What Is a Deco Mesh Wreath?
A deco mesh wreath uses wide decorative mesh to build fullness and color around a wreath frame. The mesh can be formed into poofs, ruffles, curls, or combinations, so one supply can create several different looks.
Deco mesh works particularly well for sports wreaths, seasonal wreaths, and everyday front-door decorations. You can keep the design simple with two colors or customize it with wired ribbon, a sign, ornaments, and floral accents.
Not sure how the techniques differ? See 5 Different Ways to Use Deco Mesh in a Wreath before choosing your method.
How to Make a Deco Mesh Wreath: Six Easy Steps
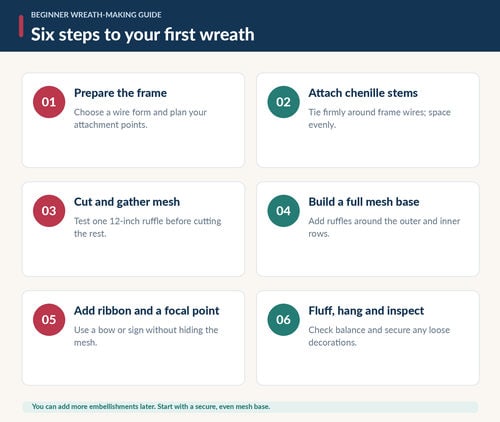
Here is the overall process. You’ll find detailed instructions below the chart.
Supplies Needed for a Beginner Deco Mesh Wreath
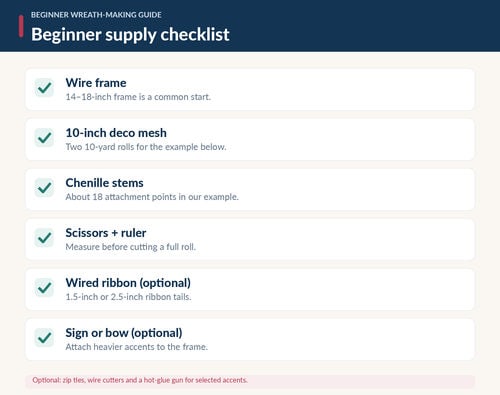
For this example, plan on:
- Wire wreath frame: a 14-inch or 18-inch frame is a useful starting point. The finished wreath will usually be larger than the bare frame.
- Deco mesh: approximately two 10-yard rolls of 10-inch-wide mesh for the 18-tie, two-ruffle-per-tie example.
- Chenille stems: about 18 tie positions, or use the ties already attached to your work form.
- Tools: scissors or a suitable mesh cutter, measuring tape, and wire cutters.
- Optional accents: wired ribbon, a bow, a wreath sign, picks, sprays, or ornaments.
These are sample quantities, not a requirement for every wreath. A different frame, more attachment points, longer cuts, or additional layers can change how much mesh you’ll need.
Browse deco mesh, wreath frames, and wired ribbon when planning your supplies.
Step 1: Prepare Your Wreath Frame
Set your frame on a stable work surface. Decide where you want the main mesh sections to sit and make sure the frame is not bent or damaged.
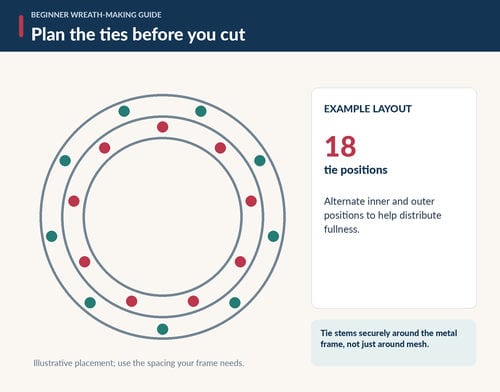
If the frame has built-in twist ties, you can use those. Otherwise, attach chenille stems securely around the frame wires. Spread the attachment points so the mesh will fill both the inner and outer areas rather than collecting in one row.
For our worked example, we use 18 attachment points. You might choose a different number depending on your frame and the fullness you want.
Beginner tip: Do not confuse frame size with finished wreath size. After adding mesh and a bow, the wreath may extend several inches beyond the frame in every direction.
Step 2: Measure and Cut the Deco Mesh
For the ruffle technique, start with 10-inch-wide deco mesh and test a 12-inch-long piece. This is a practical example length, not the only correct measurement.
- Measure 12 inches along the roll.
- Cut straight across the mesh using sharp tools.
- Lay the piece flat and check how the cut edges behave.
- Make one trial ruffle before cutting the entire roll.
Mesh can fray at cut edges. Handle the cut pieces gently and avoid repeatedly pulling on loose strands. Our guide on how to keep deco mesh from fraying explains ways to reduce that problem.
Step 3: Gather and Attach Your Deco Mesh Ruffles
Place a cut piece on your work surface and gather it through the center, working from one cut edge toward the other. Keep the sides loose and rounded while holding the center tightly. It should resemble a soft, gathered bow shape.
Slide the pinched center into one chenille-stem tie on your frame. Twist the stem securely around the gathered mesh without crushing the ruffle.
If you want a fuller example like the one in this guide, add a second 12-inch ruffle to the same tie, arranging the two pieces so they spread across the frame. Repeat around the wreath, alternating colors if you’re using more than one mesh.

Look at the wreath from the front every few ties. If one area looks bare, adjust the direction of nearby ruffles rather than immediately adding extra material.
How Much Deco Mesh Do You Need?
Here’s a simple way to estimate the mesh needed for a cut-ruffle wreath:
Tie positions × ruffles per tie × cut length = total mesh length.
For our beginner example:
- 18 tie positions
- 2 ruffles per tie
- 12-inch-long ruffles
18 × 2 × 12 inches = 432 inches, or 12 yards of deco mesh.
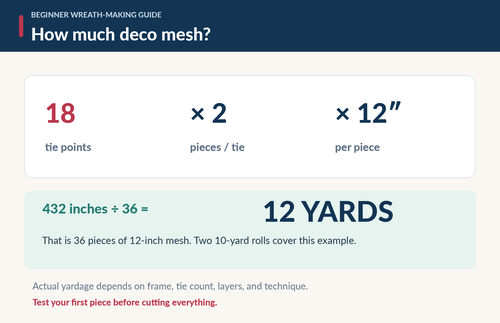
A 10-yard roll contains 360 inches, enough for 30 pieces at 12 inches each before allowing for imperfect cuts. Because the example needs 36 pieces, you would need two 10-yard rolls (with mesh left over). More elaborate layers will require more.
Important: These figures apply only to the cut-piece ruffle example. A continuous poof-method wreath is calculated differently because its mesh stays attached to the roll while you form the poofs.
Step 4: Add Ribbon Tails
Ribbon is optional, but it can add pattern and a more finished look. Choose one solid team color and one coordinating pattern if you’re designing a football or school-spirit wreath.
A simple way to add ribbon is to cut 12-inch tails, dovetail the ends, and secure them into selected chenille-stem ties between the mesh ruffles. Twist the ribbon so the printed side faces forward.
If you add two 12-inch ribbon tails at each of the same 18 ties, the tails alone require 12 yards of ribbon (36 pieces × 12 inches). Your bow would use additional ribbon. You can also use fewer tails to keep the look simpler and the cost lower.
For more guidance, read How Much Ribbon Do You Need for a Wreath? and How to Make a Bow for Your Sports Wreath.
Step 5: Add a Sign or Decorative Accents
A wreath does not need a sign to look finished. A large coordinating bow can be the only focal point. If you want a sign, hold it in place before fastening it so you can check its proportion against the finished wreath.
Attach larger signs or heavier ornaments directly to the metal wreath frame using suitable wire, chenille stems, or zip ties—not just to the loose deco mesh. Whenever possible, use more than one secure attachment point so the sign cannot rotate.
For the attachment details, see How to Attach a Sign to a Wreath.
Keep letters and important graphics visible. Small picks and sprays or ornaments can fill a gap, but a beginner wreath doesn’t need every available embellishment.
Step 6: Fluff, Hang, and Finish
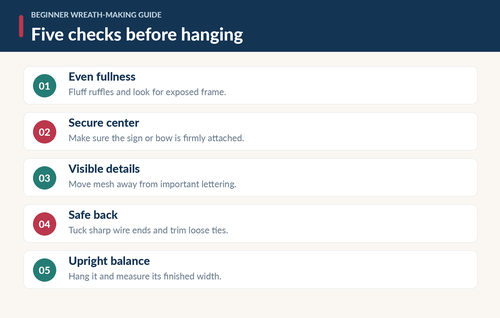
Now separate the mesh ruffles and angle them so the colors and textures look balanced. Arrange ribbon tails so the printed sides face forward. Then hang the wreath upright; gravity can change how bows and decorations sit.
Check the back as carefully as the front. Trim or tuck sharp wire ends, inspect loose zip ties, and make sure no heavy decoration can move unexpectedly.
Beginner Tips for a Full, Balanced Deco Mesh Wreath
- Start with just two or three colors. A limited palette is easier to coordinate.
- Test one ruffle first. That tells you whether your cut length works with your particular mesh.
- Don’t overfill the center. Leave room for a bow or sign if you plan to use one.
- Fluff before adding more. Sometimes shaping is all that a bare spot needs.
- Measure the completed wreath. Finished diameter and depth matter more than frame size when hanging or shipping.
Common Deco Mesh Wreath Mistakes
Cutting the Whole Roll Before Testing
The first sample may be too short or too bulky. Try it on the frame before preparing all the remaining pieces.
Attaching All the Mesh to One Ring
If everything sits on the outside, the inside may look empty. Spread attachment positions across the frame as needed.
Using Too Many Patterns
Simple mesh colors and one or two coordinating ribbon patterns are often enough.
Securing a Sign Only to the Mesh
Mesh is decorative. Wire or zip ties anchored to the frame provide the structure for heavier attachments.
Judging the Wreath While It Is Lying Flat
Hang it to check that the bow, sign and other accents do not sag or obscure one another.
Final Thoughts
Your first deco mesh wreath does not have to be elaborate. Begin with a sturdy frame, learn one mesh technique, and focus on an even base. Once you’re comfortable gathering and attaching ruffles, you can experiment with curls, poofs, bows, or team-color decorations.
Browse our wreath-making supplies for frames, ribbon, deco mesh, and accents to plan your next project.
Frequently Asked Questions About Deco Mesh Wreaths
What is the easiest deco mesh wreath method for beginners?
The ruffle and continuous poof methods are both beginner-friendly. Ruffles require measured cuts, while poofs can be built from mesh left on the roll. Choose the one you find easiest to repeat consistently.
Do I need to use ribbon on a deco mesh wreath?
No. A wreath made entirely of coordinating mesh can look beautiful. Ribbon, signs, bows, and ornaments are optional finishing details.
How much 10-inch deco mesh is needed for a wreath?
It depends on frame size and technique. For example, 18 ties with two 12-inch ruffles at each tie need 12 yards of mesh, so two 10-yard rolls would be enough for that sample layout.
Can I use a 14-inch wire wreath frame?
Yes. A 14-inch frame can be a good beginner size. Remember that the finished wreath will usually be larger once the ruffles and bow are added.
How do I keep my deco mesh wreath from looking flat?
Distribute the mesh around the frame, fluff each ruffle, and check for exposed metal. Adding more mesh is an option, but often reshaping the pieces creates better fullness without extra cost.