
A decorative sign can instantly give a wreath a focal point, whether you are making a football wreath, a school-spirit design, or an everyday door decoration. The tricky part is attaching it securely without crushing the mesh, hiding the artwork, or leaving visible wire across the front.
The good news is that how to attach a sign to a wreath comes down to three decisions: where the sign belongs, how many attachment points it needs, and where the attachment wire will be anchored.
Quick Answer: Thread floral wire or chenille stems through the sign’s existing holes and secure them to the actual wreath frame, not only the mesh or ribbon. Use at least two separated attachment points to reduce spinning. Position the sign first, tighten gradually, and fluff your decorations around it afterward.

Table of Contents
Why Add a Sign to a Wreath?
A sign can be the central visual element that gives a wreath its theme and helps the surrounding decorations work together. A baseball sign, for example, instantly explains the theme of a design while coordinated ribbon, mesh, picks and ornaments provide the supporting colors and textures.
Wreath signs can add a team name, message or graphic, guide your ribbon-color choices, fill an open center, create contrast, and give a finished wreath a more intentional look. Plan the sign before crowding the wreath with larger bows and accessories so its artwork stays visible.
Choose a size and location that match the finished wreath rather than the bare frame alone. A sign can be centered, set to one side or angled. The best placement is one that makes the design feel balanced and still lets customers read the sign clearly.
What Do You Need to Attach a Sign to a Wreath?
Most lightweight signs need only a few basic items. Choose an attachment method based on the sign material, its weight, and how easy it is to reach the wreath frame.
- A wreath sign with suitable pre-punched holes or mounting points
- Floral wire, paddle wire, or chenille stems or other wreath tools
- Optional zip ties for a compatible sign and accessible metal frame
- Wire cutters and needle-nose pliers
- Your wreath frame, ribbon, mesh, and decorative accents
If the sign does not already have attachment holes, use an attachment method appropriate for its material and the manufacturer’s instructions. For thin metal signs, read our separate guide on how to add holes to a metal wreath sign before modifying anything. Do not assume drilling or punching is safe for acrylic, wood, resin, or other materials.
How to Attach a Sign to a Wreath: 7 Steps
These seven steps work for many round and rectangular signs on deco mesh or other wreath bases. You can plan the position before the wreath is finished and make the final attachment once the larger decorations are arranged.
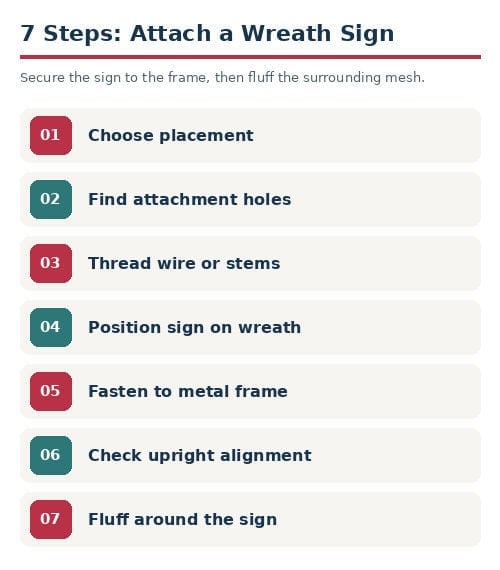
Step 1: Decide Where the Sign Will Go
Lay your wreath on a flat surface and test the sign in several positions. A sign can sit in the center, slightly to one side, or at an intentional angle. Think about the bow and other ornaments so they do not compete with the sign.
Stand back and look at the entire wreath. A rectangular sign often works beautifully in the middle of a full deco mesh wreath; a round sign may look more balanced off-center on a grapevine design.

Step 2: Locate the Attachment Points
Check the existing holes or mounting hardware. Round signs may have holes toward their outer edge; rectangular signs may have holes at two or four corners. Whenever possible, use two separated attachment points at minimum. A heavier or larger sign may need three or four.
Consider where the wreath frame is behind those points. The easiest holes to reach are not always at exactly the top and bottom of the sign.

Before attaching your wreath sign, make sure you have everything ready! Our FREE Wreath Sign Attachment Preparation Checklist walks you through sign placement, attachment points, suitable fasteners, and final stability checks. Keep this one-page printable beside your workspace to help you prepare and avoid common attachment mistakes.
Step 3: Thread Your Wire or Chenille Stems
Feed a separate length of attachment wire or a sturdy chenille stem through each chosen hole. Keep enough length on both sides to reach through the wreath’s decorations and wrap securely around the frame.
Attach the ties to the sign before trying to position it in dense ribbon or mesh. Avoid sharp wire ends on the front; tuck or trim them carefully behind the sign.
Step 4: Position the Sign on the Wreath
Put the sign in its planned spot. Gently separate the deco mesh or ribbon near each attachment point to find the underlying metal frame. Guide the ties toward the frame without flattening the surrounding loops.
Do not pull the sign deeply into the mesh yet. It should sit where the design looks intentional and the lettering remains readable.
Step 5: Secure the Sign to the Wreath Frame
Fasten one attachment point loosely around a sturdy part of the frame, then secure the opposite point. Adjust the position and tighten the two sides gradually. The sign should not rock, twist, or slip when the wreath moves.
The structural rule is simple: the frame carries the sign’s weight; the mesh is decorative. Pulling too tightly can bend the frame, distort your wreath, or bury the sign.

Step 6: Check the Wreath Upright
Hang the wreath temporarily or hold it upright. Make sure the sign faces forward, stays where you intended, and does not tilt. If it moves, inspect whether the ties actually reach the frame and whether an additional anchor point is needed.
Check the back for loose ends or sharp zip-tie cuts that might scratch the door. Keep every connection tidy and secure.
Step 7: Fluff the Wreath Around the Sign
Bring nearby ribbon, mesh, floral picks, or small ornaments toward the edges of the sign to hide the attachment hardware. Leave the printed message visible—decorations should frame the sign, not cover it.
Repeat colors from the sign in your surrounding wreath ribbon and deco mesh to make the design feel coordinated.
Which Attachment Method Works Best?
Floral wire, chenille stems, and zip ties all have a place in wreath making. The right choice depends on the sign and how you intend to secure it.

Floral Wire
Floral wire is slim and easy to conceal. It works well with pre-punched metal signs, especially when you need to make small adjustments to the angle or position.
Pipe Cleaners or Chenille Stems
These are easy to twist and often sufficient for lightweight signs. Choose a coordinating color and check that each stem is long enough to reach the frame securely.
Zip Ties
Zip ties can be useful when you can pass them through a suitable mounting hole and around the frame. Tighten carefully, trim the excess, and orient the cut end toward the back. They are not the best option when they cannot reach a structural part of the frame.
How Many Attachment Points Does a Wreath Sign Need?
For most lightweight wreath signs, two widely separated points are a sensible starting place. One tie by itself can act like a hinge. A large rectangle, heavier attachment, or sign placed at an angle may benefit from three or four mounting points.
If the sign keeps tipping, do not simply pull one tie harder. Confirm that both attachments reach the frame and consider a stabilizing tie at the side that moves.
Should You Attach a Sign Before or After the Ribbon?
Plan the sign position before you finish all your embellishments. You can temporarily place the sign while arranging bows and ribbons, then attach it after you establish the major design elements. This prevents an oversized bow from covering your focal point.
How Big Should the Wreath Sign Be?
Sign size should relate to the finished outside diameter of the wreath, not only the size of its bare metal form. As one practical example, a 12-inch-wide sign covers about half the width of a 24-inch finished wreath, leaving room for a full border of mesh and ribbon.
That ratio is a design starting point, not a universal rule. Off-center grapevine wreaths and shaped signs can use very different proportions.

Common Mistakes When Attaching Wreath Signs
- Using only one tie: the sign can rotate or hang crooked.
- Tying only to deco mesh: the sign may shift because the mesh is flexible.
- Overtightening: the sign can disappear into the wreath or deform the frame.
- Covering the artwork: large bows or picks can hide the focal message.
- Ignoring the sign material: the wrong hole-making method can crack or damage it.
- Skipping the upright check: a sign that looks straight lying flat may tilt when hanging.
How to Make the Sign Look Like Part of Your Wreath
A well-attached sign looks intentional. Keep its main text readable, use coordinated ribbon and accents around its edge, and distribute the wreath’s visual weight so one side does not overpower the other. A few strategically placed picks and sprays can help blend the sign into a floral or grapevine wreath.
For more visual inspiration, explore our wreath signs, team wreath supplies, and beginner deco mesh wreath tutorial.
Final Thoughts
Learning to attach a wreath sign is mostly about choosing the right mounting points and securing them to the frame. Once the sign is stable, adjust the bow, mesh, and small accents around it until the whole wreath looks balanced.
Whether your focal point is a sports sign, a seasonal message, or a round metal sign on grapevine, a secure attachment and careful placement will help the finished wreath look polished and hang the way you intended.
Frequently Asked Questions
What is the easiest way to attach a sign to a wreath?
Use existing attachment holes with floral wire or chenille stems, and secure those ties to the wreath frame using at least two points.
Can I use zip ties on a wreath sign?
Yes, if the sign has a suitable attachment point and the tie can wrap around the underlying frame. Trim the end toward the back.
Should I attach a sign to mesh or the frame?
Attach it to the frame whenever possible. Deco mesh and ribbon are decorative and do not provide the same structural support.
How many attachment points should I use?
Two separated points work for many lightweight signs. Larger or heavier signs may need three or four.
What if my metal wreath sign has holes in the wrong places?
For thin metal signs, you may be able to add suitable holes using the correct tool and safe technique. Review the separate metal-sign hole guide before modifying a sign.
Should I put the sign on before the bow?
Plan the sign and bow positions together before completing the wreath. Make the final attachment when the layout is balanced.