
A Thanksgiving centerpiece with ribbon is an easy way to make the holiday table feel warm and welcoming without buying decorations you can only use once a year. With wired ribbon, a little deco mesh, decorative picks, and a few accents you may already own, you can build a low arrangement that looks full from every seat. This step-by-step project uses versatile colors and wreath-making supplies, so you can change the palette later for Christmas, birthdays, or game-day gatherings.
Quick Answer: To make a Thanksgiving centerpiece with ribbon, start with a stable 10–12″ wire wreath frame or shallow tray, add 10–14 gathered deco mesh pieces if you want extra fullness, secure small wired-ribbon bows around the base, and tuck in short decorative picks. Finish with mini pumpkins or a flameless LED candle. Keep the arrangement low enough for guests to see one another across the table.
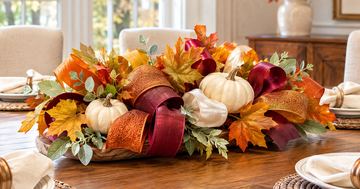
Table of Contents
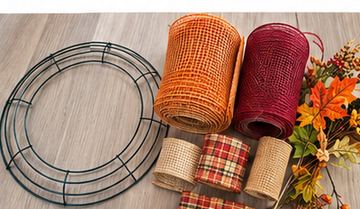
Thanksgiving Centerpiece With Ribbon: Supplies and Quantities
This example creates a centerpiece roughly 18–22″ wide, depending on the length of your picks and how full you make the bows. The quantities are a practical starting point, not a rigid kit. For a long dining table, make two smaller arrangements rather than one oversized piece that blocks conversation.
- Base: one 10–12″ wire wreath frame plus a shallow, stable tray or nonslip mat; a low wooden bowl works as an alternative.
- Wired ribbon: about 2–3 yards of 2.5″ wide main-color ribbon and 1–2 yards of 1.5″ accent ribbon, depending on bow size.
- Deco mesh (optional): 10″-wide mesh in a neutral, copper, or coordinating shade; allow roughly 3–4 yards for 10–14 loose gathered sections.
- Decorative picks: 4–8 short leaf, eucalyptus, fern, or coordinated color picks; use only as many as fit your base.
- Finishing accents: 1–3 small faux pumpkins, pinecones, or other lightweight accents you already own; an optional battery-operated candle.
- Tools: scissors, wire cutters, chenille stems or floral wire, and optional zip ties or a low-temperature glue gun for nonflammable accent placement.
Browse the colors that suit your table in our wired ribbon and ribbon selection, deco mesh, decorative picks and sprays, and wreath frames. Choose useful solids, metallics, checks, or textures rather than depending on a printed Thanksgiving theme.
How to Make a Thanksgiving Centerpiece With Ribbon: Step by Step
Step 1: Choose a low, stable base
Set the wreath frame flat on a tray or protected tabletop. A shallow tray contains loose accents and makes the finished centerpiece easier to move when it is time to serve dinner. If you use a wire frame, keep the design centered and evenly balanced; do not assume the ring itself is secure on a slippery tabletop. A small nonslip pad beneath the tray can help prevent movement.
Plan for an arrangement about 8–10″ tall or less where possible. Sit at the table and check the view across it before committing to any taller stems. If you would rather skip the wire frame, you can build the same design in a wooden dough bowl or low basket with a securely fitted reusable floral base.
Step 2: Select two fall colors and a neutral
Choose a main color such as burnt orange, copper, or burgundy. Add a second coordinating color, then soften the combination with cream, champagne, or natural green. Repeating the same two or three shades in ribbon and picks creates a more intentional look than mixing every autumn color available. For a simple elegant table, copper and cream work beautifully; for a richer harvest palette, try burgundy, orange, and gold.
Step 3: Add a little deco mesh for fullness
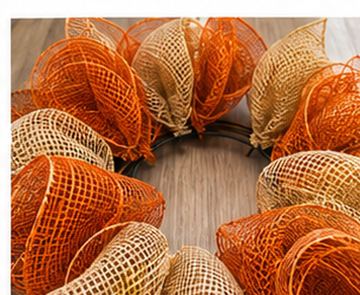
Cut about 10–14 pieces of 10″-wide deco mesh, each approximately 10–12″ long. Gather each piece loosely through the middle to make a small ruffle or loop, then attach it to the frame using chenille stems. Space the pieces around the frame rather than stacking them into a tall wreath. Keep the center opening clear for your focal accent. If you prefer a cleaner floral look, use fewer mesh pieces or omit mesh entirely.
Step 4: Shape small wired-ribbon bows
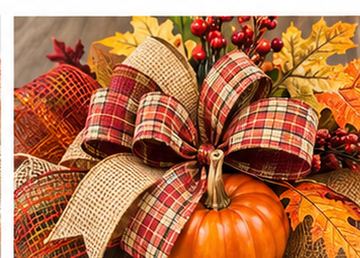
Instead of one huge wreath bow, make three to five smaller ribbon accents. For each one, pinch the ribbon at the center, form two or three loops on each side, and fasten the center with a short chenille stem or floral wire. Wired edges allow you to fluff the loops without making a stiff, flat ribbon circle. Mix a wider main-color ribbon with a narrower accent ribbon if you want extra contrast.
Attach the bows at even intervals, letting some loops angle outward and others fill gaps between the mesh. Trim any long ribbon tails before they touch plates or serving dishes. If you’re new to decorating with ribbons and floral accents, our ribbon and picks for floral arrangements guide explains how the materials work together.
Step 5: Insert picks and sprays from the outside inward
Begin with four short decorative picks, pointing them slightly outward to extend the arrangement. Add others only where you see gaps. Trim overly long stems with wire cutters and secure them to the frame using floral wire or chenille stems, keeping sharp cut ends covered and away from people and table linens. Choose greenery, fern, leaf, or curly picks that repeat your ribbon colors. Avoid making every pick stand upright; a lower silhouette is more practical at a dining table.
For extra help with positioning and securing stems, see how to add picks and sprays to a wreath. The attachment principles also work for a tabletop frame.
Step 6: Add one focal accent
Place one medium faux pumpkin or two smaller ones in the center opening, supported by the tray beneath the wreath frame. If you prefer a glow, use a battery-operated LED candle rather than an open flame near mesh, ribbon, or artificial foliage. Keep every accent stable: a dining centerpiece must tolerate someone moving a chair or setting down a serving platter without loose pieces tipping over.
Step 7: Turn, fluff, and test the arrangement
Rotate the finished centerpiece to check it from every angle. Fluff collapsed ribbon loops, tuck in exposed fasteners, and remove any pieces that hang too close to food or drinks. Put the centerpiece in the middle of the table, sit down on either side, and make sure everyone can still see one another. You should have a full, polished display that is easy to lift out of the way when needed.
An Easy Alternative: A Low Thanksgiving Centerpiece in a Bowl
For a smaller table, make a simple version in a shallow wooden bowl. Arrange two or three small faux pumpkins first, place short decorative picks around them, and tuck in a few ribbon loops. You can use a pinch of mesh underneath as a soft base, but it is optional. This style takes fewer supplies, leaves more room for serving dishes, and is easy to refresh later with a completely different color palette.

Make It Your Own With Different Colors
The best part of a reusable centerpiece base is that the same project can work long after Thanksgiving. Keep the tray or frame, replace the faux accents, and choose ribbon and mesh in colors you already love. You do not need holiday-specific printed ribbon or a themed sign to create a seasonal look.
- Thanksgiving: copper, burnt orange, burgundy, cream, and muted green.
- Christmas: red, evergreen, white, and a touch of gold or silver.
- Spring and Easter: pastel pink, pale blue, lavender, yellow, or fresh green.
- Patriotic summer celebrations: red, white, and navy ribbon.
- Football watch parties: your team colors plus a simple white, black, or metallic accent.
For a football Thanksgiving get-together, our football party centerpiece ideas provide more game-day inspiration. Pair an understated table arrangement with a coordinating bow on the serving table or entryway wreath for a consistent look.
Helpful Tips Before You Set the Table
- Keep the view open: low ribbon loops and outward-facing picks are usually more guest-friendly than tall stems.
- Leave room for food: consider a pair of small centerpieces if the dining table will hold many serving dishes.
- Secure everything: check fasteners and ensure pumpkins or other accents cannot roll.
- Protect the table: keep wire ends, glue, and rough trays off the tabletop with a liner or pad.
- Choose flameless lighting: ribbon and deco mesh are combustible. For actual flame safety, review the National Candle Association’s candle safety advice; never place an open flame in a ribbon-and-mesh arrangement.
- Store for reuse: keep the bows and frame together, and separate any fragile decorative accents before storing.
Thanksgiving Centerpiece FAQs
How much ribbon do I need for a Thanksgiving centerpiece?
For a compact 18–22″ arrangement, start with about 3–5 yards of wired ribbon total across one or two widths. Three to five small bows typically work better on a dining table than one very large bow, but adjust the number to the size of your base.
Can I make a Thanksgiving centerpiece without deco mesh?
Yes. Use a shallow bowl or tray, small ribbon bows, decorative greenery, and one or two focal accents. Deco mesh is helpful for fullness but is not required.
What can I use instead of pumpkins?
Try a short vase with faux greenery, a wooden ornament, pinecones, or a safe battery-operated LED candle. Choose a focal piece that is stable, lightweight, and easy to remove when dinner is served.
How far ahead of Thanksgiving can I make the centerpiece?
If you use faux greenery, faux pumpkins, ribbon, and mesh, you can assemble the centerpiece well ahead of the holiday and store it carefully. With fresh flowers or foliage, plan around the materials’ expected freshness and make final adjustments closer to the meal.
Can I reuse the same centerpiece for other holidays?
Absolutely. Keep the underlying frame or bowl and replace the color accents. Solid and metallic ribbons make it especially easy to redesign a centerpiece for Christmas, spring parties, or game days.
Shop Versatile Supplies for Your Next Centerpiece
You do not need a holiday-specific product to make a seasonal centerpiece. Start with colors you can use again in bows, wreaths, and other decorations. Explore ribbon, deco mesh, picks and sprays, and wreath frames at Sports Wreath Shop. For even more free projects and printable planning tools, visit the Wreath Maker Resource Center.